


Creating accessible environments is no longer just a legal obligation—it is a social responsibility and a design priority. Whether you are working on a residential entryway, a commercial building, or a public facility, ensuring that your ramp meets accessibility standards is essential for safety, usability, and compliance. One of the most practical tools that simplifies this process is an ADA ramp slope calculator.
Understanding how to use this calculator effectively can make the difference between a ramp that merely “works” and one that truly serves people of all abilities. In this guide, we will explore how ADA ramp slope calculators function, why they matter, and how to use them step by step to design safe and compliant accessibility solutions.
Understanding ADA Ramp Slope Basics
Before diving into the calculator itself, it is important to understand the concept of ramp slope and why it matters. In accessibility design, slope refers to the steepness of a ramp, determined by the relationship between vertical rise and horizontal run.
The Americans with Disabilities Act (ADA) establishes a maximum slope of 1:12, meaning that for every 1 inch of vertical rise, the ramp must extend at least 12 inches horizontally. This translates to a slope of approximately 8.33%, which is considered safe and manageable for most wheelchair users.
This standard is not arbitrary. A steeper ramp can be difficult—or even dangerous—for individuals using wheelchairs, walkers, or other mobility aids. A gentler slope, on the other hand, provides better control, reduces fatigue, and enhances overall safety.
What Is an ADA Ramp Slope Calculator?
An ADA ramp slope calculator is a digital or manual tool that helps you determine whether your ramp design meets accessibility guidelines. It calculates slope using a simple formula:
Slope=RiseRun×100\text{Slope} = \frac{\text{Rise}}{\text{Run}} \times 100
Here, the “rise” is the vertical height the ramp must overcome, and the “run” is the horizontal distance covered by the ramp.
The calculator then compares the result to ADA standards and indicates whether the ramp is compliant. Many advanced calculators also provide additional outputs such as required ramp length, number of landings, and whether handrails are needed.
Why Using a Calculator Matters
Designing a ramp without accurate calculations can lead to serious problems. A ramp that is too steep may be unusable for many individuals, while one that does not meet legal requirements can result in costly modifications or legal consequences.
Using an ADA ramp slope calculator eliminates guesswork. It ensures that your design is based on precise measurements and recognized standards. It also helps you optimize space, especially in areas where layout constraints make ramp design challenging.
Beyond compliance, the calculator supports inclusive design. It ensures that your ramp is not only technically correct but also comfortable and practical for everyday use.
Step-by-Step Guide to Using an ADA Ramp Slope Calculator
Using an ADA ramp slope calculator is straightforward, but accuracy is crucial. Each step builds on the previous one, so careful measurement and input are essential.
Measuring the Vertical Rise
The first step is to determine the vertical rise. This is the height difference between the starting point and the endpoint of the ramp. It is typically measured in inches or feet.
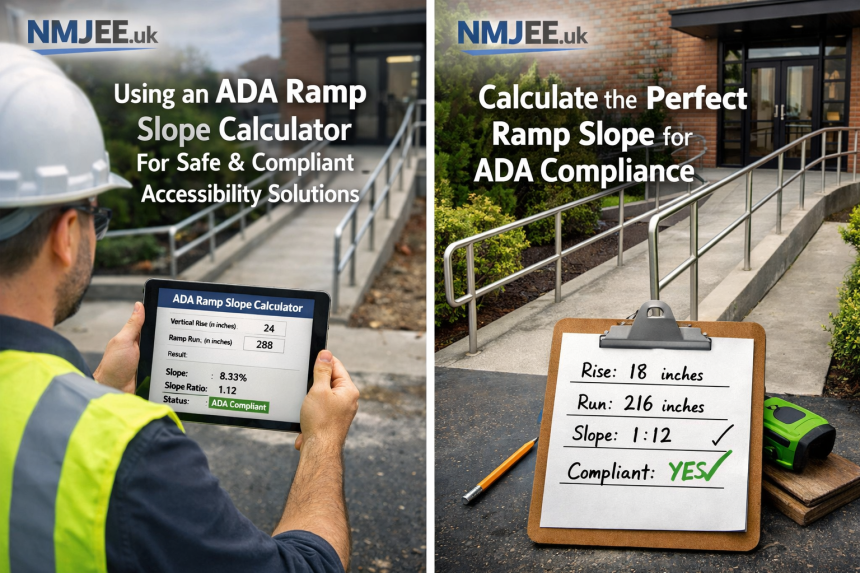
For example, if a porch is 24 inches above ground level, the rise is 24 inches. This measurement forms the foundation of all subsequent calculations.
Determining the Required Ramp Length
Once you know the rise, the next step is to calculate the required ramp length. ADA guidelines require a minimum ratio of 1:12, meaning:
Run=Rise×12\text{Run} = \text{Rise} \times 12
So, for a 24-inch rise, the ramp must be at least 288 inches (or 24 feet) long.
Most calculators will perform this step automatically when you input the rise. This feature is especially useful when working with larger elevation changes or complex layouts.
Inputting Data into the Calculator
With your measurements ready, you can input the rise and, if required, the available run into the calculator. Some tools allow you to input both values, while others calculate one based on the other.
The calculator will then compute the slope percentage and display whether it meets ADA standards. If the slope exceeds 8.33%, adjustments will be necessary.
Interpreting the Results

After entering your data, the calculator will provide results such as:
- Slope percentage
- Slope ratio (e.g., 1:12)
- ADA compliance status
If the slope is within acceptable limits, your design is compliant. If not, the calculator may suggest increasing the ramp length or modifying the layout.
Understanding these results is key to making informed design decisions. A compliant slope ensures safety, while a non-compliant one signals the need for revision.
Incorporating Landings and Breaks
ADA guidelines do not allow infinitely long ramps without interruption. If the total rise exceeds 30 inches, the ramp must be divided into multiple sections with landings in between.
Landings serve as resting points and provide a safe space for turning or changing direction. They must be at least 60 inches long and as wide as the ramp itself.
Many ada ramp slope calculator include features that automatically determine the number of required landings based on your input. This helps ensure that your design is not only compliant but also user-friendly.
Considering Width and Cross Slope
While slope is the primary focus, other factors also play a crucial role in accessibility. ADA standards require a minimum ramp width of 36 inches, ensuring enough space for wheelchair users.
Additionally, cross slope—the sideways tilt of the ramp—must not exceed 1:48 (about 2%). This prevents users from feeling as though they are being pulled sideways, which can be uncomfortable or unsafe.
A comprehensive calculator may include these considerations, helping you design a ramp that meets all relevant requirements.
Handrails and Safety Features

Handrails are another important aspect of ramp design. They are typically required when the ramp rise exceeds 6 inches or when the horizontal length is greater than 72 inches.
These rails provide stability and support, especially for individuals who may struggle with balance. ADA-compliant handrails must be installed on both sides and positioned at a height that is easy to grip.
Some advanced calculators will indicate when handrails are necessary based on your input, making it easier to incorporate these features into your design.
Adjusting for Space Constraints
In real-world scenarios, space is often limited. This can make it challenging to achieve the ideal 1:12 slope within a given area.
An ADA ramp slope calculator can help you explore alternative solutions, such as:
- Adding switchbacks
- Incorporating intermediate landings
- Reconfiguring the layout
These strategies allow you to maintain compliance while adapting to spatial limitations. The calculator acts as a guide, helping you balance practicality with accessibility.
Practical Example of Calculator Use
Imagine you need to design a ramp for a building entrance that is 18 inches above ground level. By entering this value into the calculator, you would determine that the required run is 216 inches (18 feet).
The calculator would confirm that this configuration meets the 1:12 slope requirement and may also indicate the need for handrails and landings.
This simple example illustrates how the calculator transforms raw measurements into actionable design insights.
Common Mistakes to Avoid
Even with a calculator, mistakes can occur if the inputs or assumptions are incorrect. One common error is confusing ramp length with horizontal run. ADA calculations are based on horizontal distance, not the sloped surface.
Another mistake is ignoring additional requirements such as landings or handrails. A ramp may meet slope requirements but still fail to comply with other ADA standards.
Failing to account for future use is also a frequent oversight. Designing a ramp that meets minimum requirements is good, but designing one that is comfortable and practical for daily use is even better.
Benefits of Using an ADA Ramp Slope Calculator
Using an ADA ramp slope calculator offers numerous advantages. It simplifies complex calculations, reduces the risk of errors, and ensures compliance with established standards.
It also saves time and resources by helping you get the design right the first time. Instead of trial and error, you can rely on accurate data to guide your decisions.
Most importantly, it supports inclusive design. By ensuring that your ramp is safe and accessible, you contribute to a more equitable and welcoming environment for everyone.

The Role of Accessibility in Modern Design
Accessibility is no longer an afterthought in architecture and construction. It is a fundamental aspect of modern design, reflecting a commitment to inclusivity and equal access.
Tools like ADA ramp slope calculators play a crucial role in this process. They empower designers, builders, and homeowners to create spaces that accommodate diverse needs.
By using these tools effectively, you can ensure that your projects not only meet legal requirements but also enhance the quality of life for those who rely on accessible features.
Conclusion
An ADA ramp slope calculator is more than just a tool—it is a bridge between technical requirements and real-world usability. By understanding how to use it properly, you can design ramps that are safe, compliant, and genuinely accessible.
From measuring the rise to interpreting the results, each step contributes to a design that meets both legal standards and human needs. When combined with thoughtful planning and attention to detail, the calculator becomes an essential part of creating inclusive spaces.